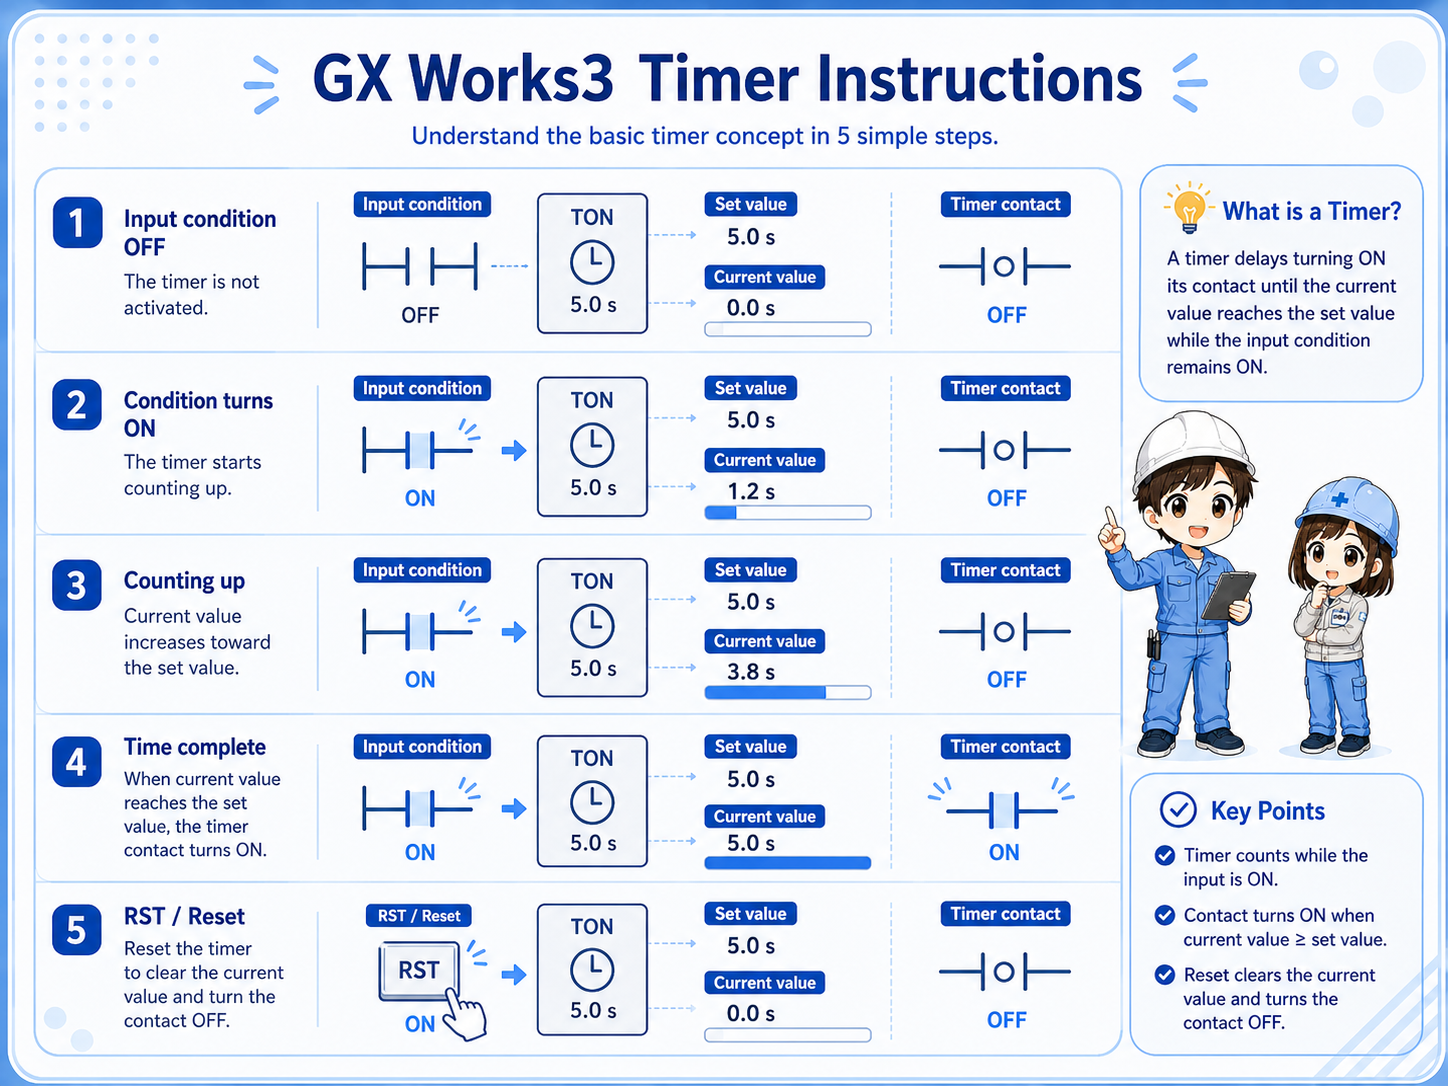
1. What is a timer instruction?
A timer instruction watches a condition and changes its contact state after a defined time has passed.
In GX Works3 and MELSEC-style ladder programs, timer instructions are used when a machine needs a delay: waiting before starting, keeping a signal for a short time, delaying an alarm, or accumulating operation time.
The important beginner point is this: do not look only at the timer contact. Check the input condition, set value, current value, completion contact, and reset behavior as one group.
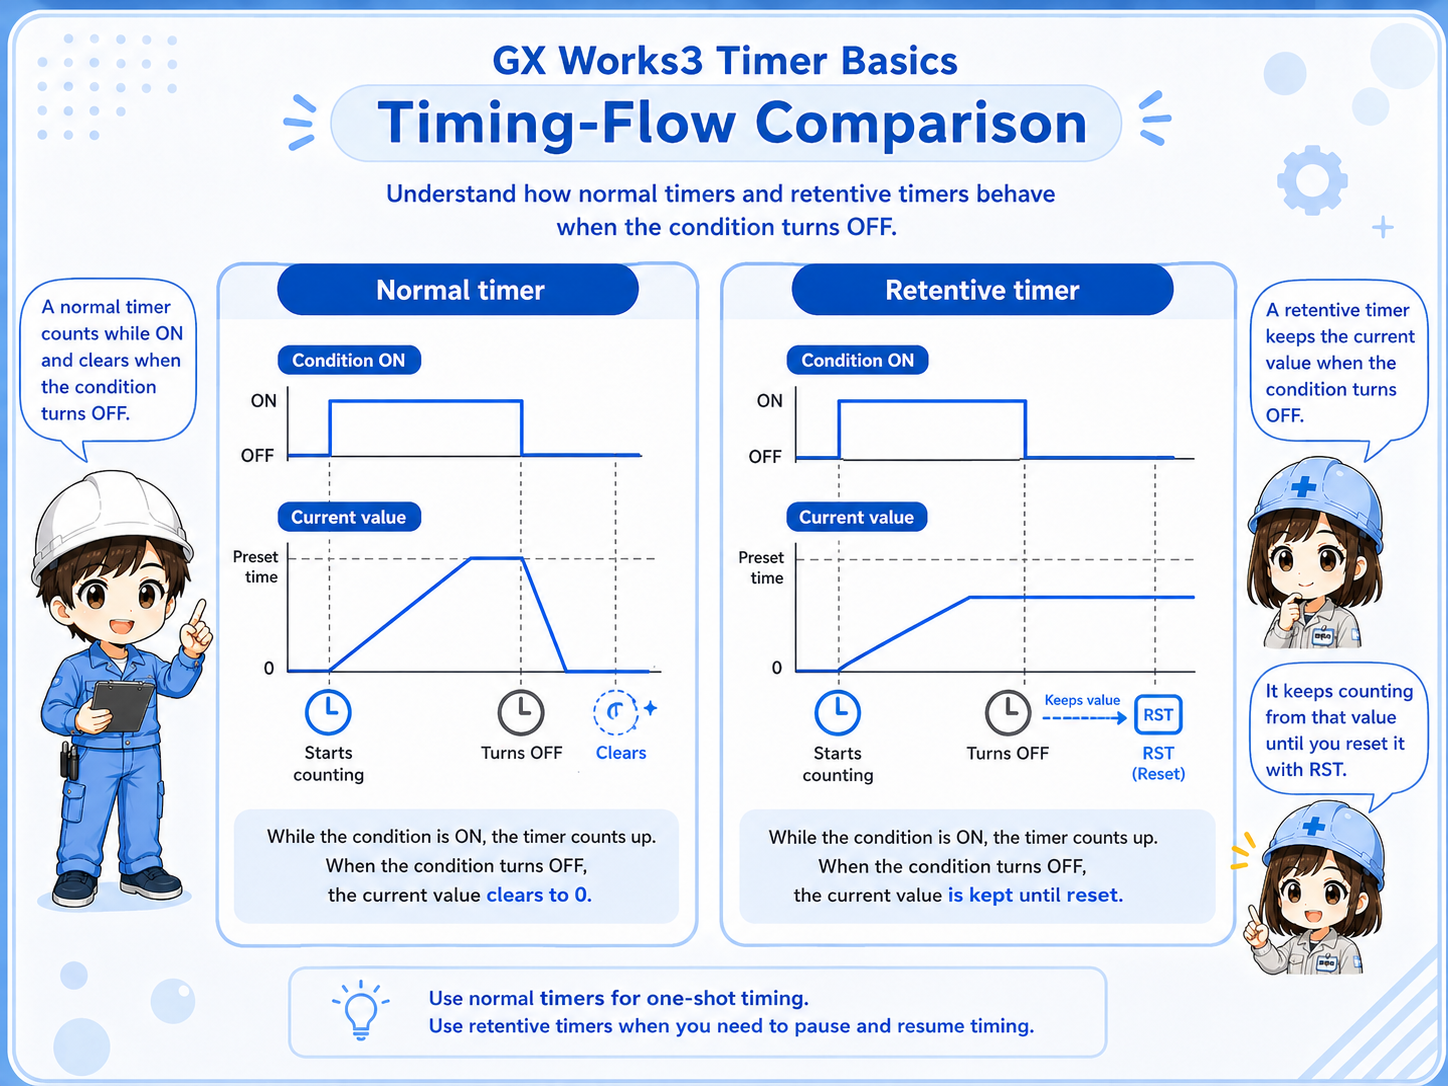
2. Quick conclusion: normal timers and retentive timers differ when the condition turns OFF
The most practical difference is whether the current value clears or remains.
For field troubleshooting, first check what happens when the timer input condition turns OFF. A normal timer commonly returns its current value to zero. A retentive timer keeps the accumulated value until a reset operation clears it.

When a timer behaves strangely, check whether it is supposed to clear automatically or keep its value.

So for retentive timers, I should always look for the RST condition too.
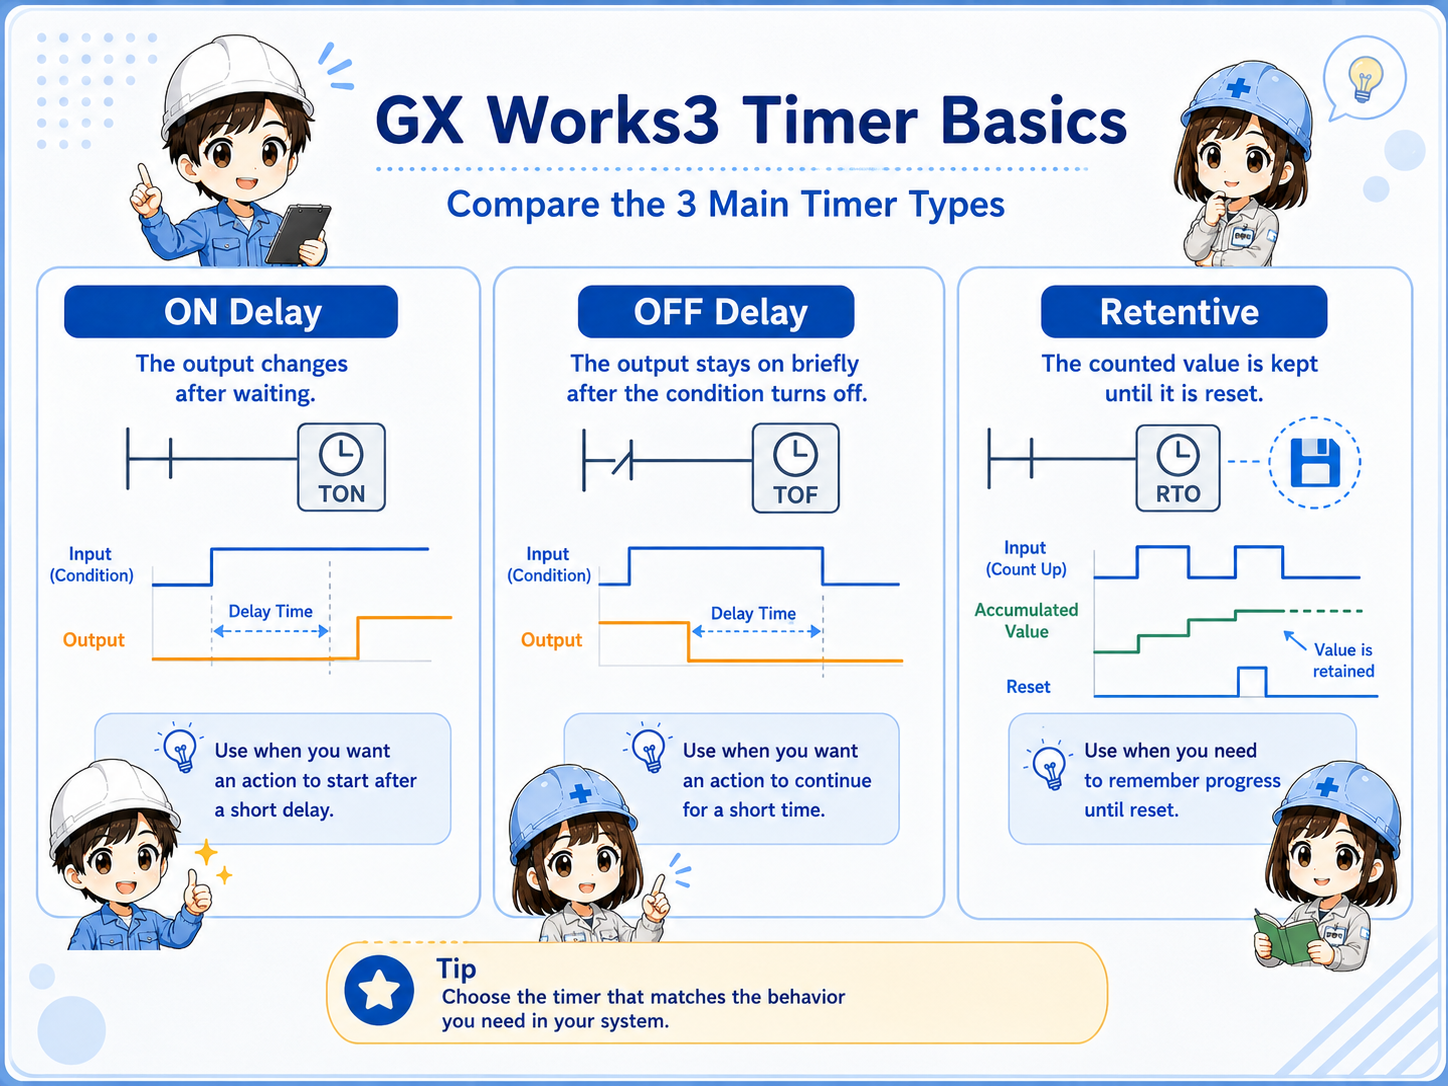
3. ON-delay timer: wait before turning ON
ON-delay behavior means the output condition becomes valid after the input has stayed ON for the set time.
An ON-delay timer is commonly used when a machine should not react immediately. Examples include delayed start, alarm delay, confirmation time, or filtering a short unstable condition.
Field reading point
If the timer never completes, first check whether the input condition stays ON long enough for the current value to reach the set value.
4. OFF-delay behavior: keep a signal briefly after the condition turns OFF
OFF-delay behavior is used when a signal should remain active for a short time after the original condition disappears.
Depending on the PLC series and instruction set, OFF-delay behavior may be implemented by a specific instruction or by surrounding ladder logic. The beginner point is to understand the purpose: the output should not drop immediately when the input turns OFF.
Check the project instruction help
Exact instruction names and available timer types can vary by CPU series and project setting. Confirm the GX Works3 help or official manual before editing real programs.
5. Retentive timer: keep the current value
A retentive timer keeps accumulated time even if the input condition turns OFF.
Retentive timers are useful when you want to accumulate running time across multiple ON periods. They are different from normal timers because the current value does not simply disappear when the input condition turns OFF.
Because the value remains, the reset design becomes important. Decide what action clears the timer: a reset button, recovery sequence, mode change, daily reset, or another defined condition.
6. Normal timer vs retentive timer
Compare them by input condition, current value, completion contact, and reset behavior.
| Timer type | Basic behavior | Field check |
|---|---|---|
| Normal timer | Counts while the condition is ON and commonly clears when the condition turns OFF. | Check whether the condition stays ON long enough. |
| Retentive timer | Accumulates current value and keeps it until reset. | Check both current value and RST condition. |
| OFF-delay behavior | Keeps an output condition for a short time after the input turns OFF. | Check whether the program uses a dedicated instruction or surrounding logic. |
7. Set value and time unit: do not skip this check
A timer set value only makes sense together with its time unit.
A common beginner mistake is to read only the number and ignore the unit. The same value can represent different real times depending on the instruction, device, and CPU series.
Set value
The target timing value used by the instruction.
Current value
The value that increases while the timer is counting.
Time unit
The base unit that determines the actual time.
Completion contact
The condition that changes state when the set value is reached.
8. RST reset is essential for retentive timing
If a retentive timer keeps its value, the program must define when to clear it.
For retentive timer logic, always search for the reset condition. If RST happens too early, the timer may never complete. If RST never happens, the timer may stay completed and cause the next operation to start from an unexpected state.
Common failure pattern
The timer looks wrong after restart because the accumulated value remained from a previous operation and was not cleared at the intended timing.
9. Field check points when a timer does not work
Check condition, set value, current value, time unit, completion contact, and reset in order.
- Check whether the timer input condition actually turns ON.
- Confirm that the condition stays ON long enough.
- Compare the set value with the expected time unit.
- Watch whether the current value increases.
- Check whether the completion contact changes state at the expected timing.
- For retentive timers, confirm when RST clears the current value.
- Check scan time or short pulses if the condition is very brief.
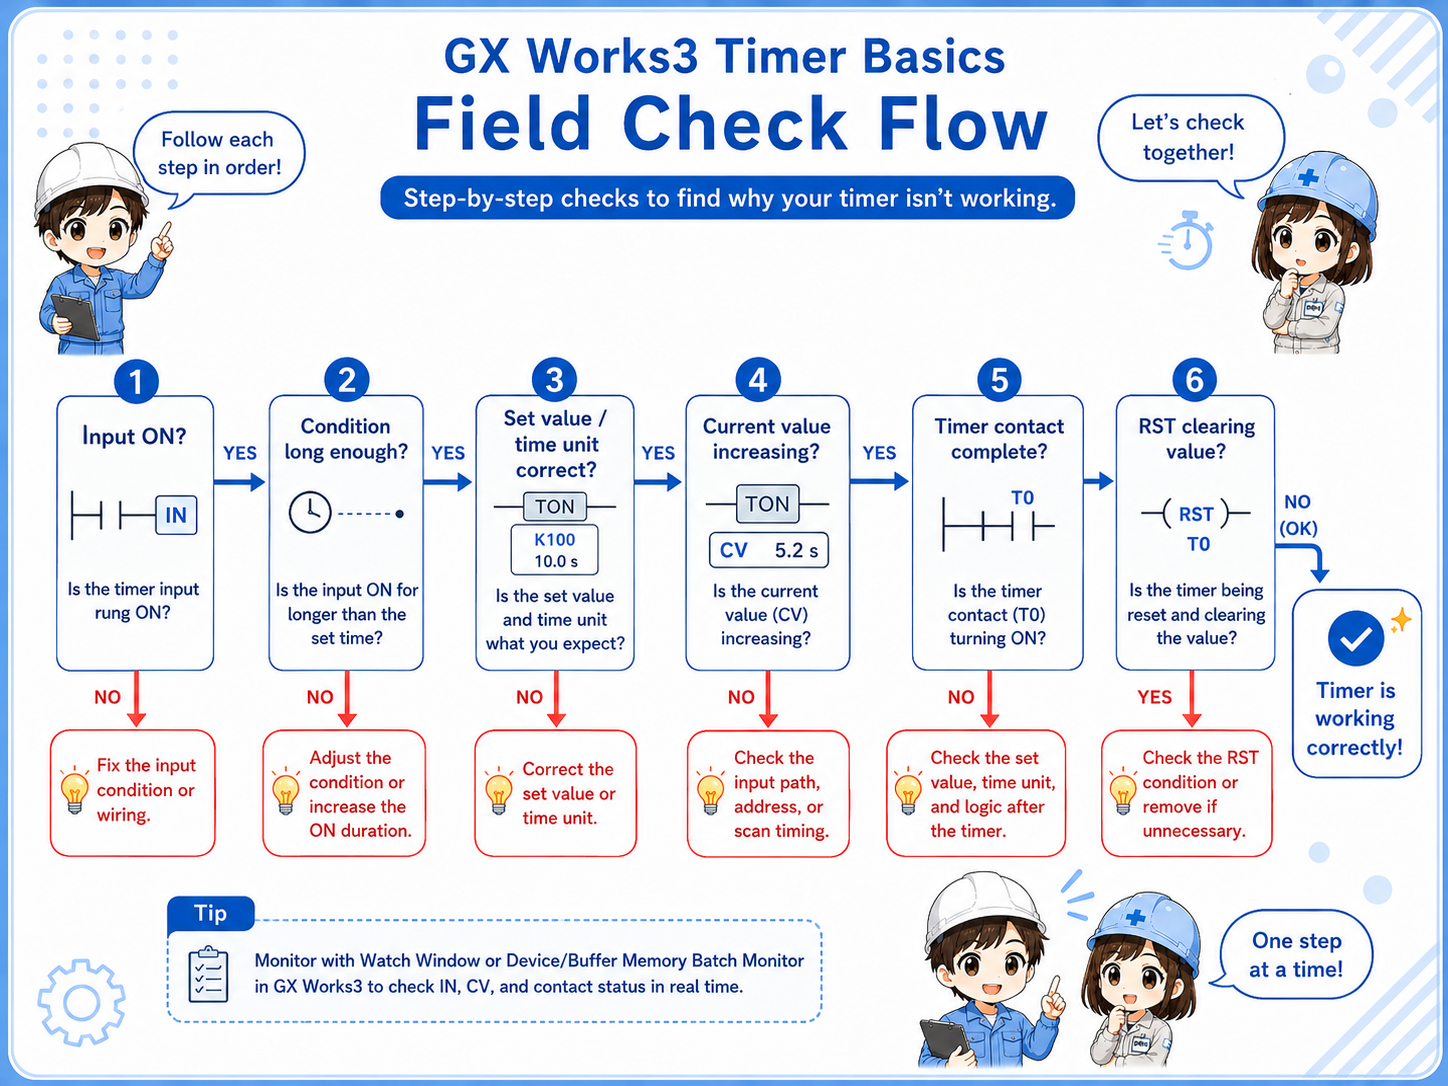
10. GX Works3 monitoring points
Monitor the current value and contact state at the same time.
In GX Works3 online monitoring, check whether the input condition is ON, whether the current value is moving, and whether the timer contact changes after the expected time. If a very short signal is involved, also consider whether scan timing or one-shot logic affects the result.
Practical monitoring set
Watch input condition, set value, current value, completion contact, and reset condition together.
11. Common beginner mistakes
Most timer mistakes come from unit confusion, reset timing, or misunderstanding retentive behavior.
- Ignoring the time unit: The set value number alone is not enough.
- Condition turns OFF too early: The current value never reaches the set value.
- RST is missing: A retentive timer keeps old accumulated time.
- RST is too early: The timer clears before completion.
- OFF-delay behavior is assumed: The actual project may use a different instruction or ladder pattern.
- Only the contact is checked: The current value and input condition are ignored.
12. Summary
GX Works3 timer instructions are easier to troubleshoot when you separate the input condition, set value, current value, completion contact, and reset behavior. The most important beginner distinction is whether the current value clears when the condition turns OFF or stays accumulated until RST.
Once you understand this, timer logic connects naturally with OUT/SET/RST, counters, one-shot signals, and general ladder troubleshooting.
Related articles
These English articles are already available and connect well with timer instruction basics.